Litigation Holds in Office 365
Understanding Litigation Holds
The normal workflows for deleted mailbox items in Office 365 are as follows: When a user either permanently deletes a mailbox item or deletes an item from the Deleted Items folder, that item is moved to the Deletions subfolder in the Recoverable Items folder. Mailbox items are also moved to the Deletions subfolder automatically by the deletion policy when their retention period expires. When a user purges an item in the Recoverable Items folder or the retention period expires for an item in that folder, the item is moved to the Purges subfolder in the Recoverable Items folder and marked for permanent deletion.
An Office 365 litigation hold suspends any retention policy or automatic deletion for a given mailbox so that no mailbox content can be removed from the mailbox. It preserves the original and all modified versions of each item, and even if a user deletes an item from their mailbox using any version of Outlook, Office 365 retains the item for discovery purposes. The user can continue to send and receive new mail. The user’s archive mailbox (if it’s enabled) is also placed on hold.
Note that the litigation hold is not an alternative to backup; it is designed to preserve user data for e-discovery purposes, not to restore lost data.
You can configure how long a litigation hold lasts. At the expiration of that period, the hold will automatically be removed and the existing retention policy (if any) that applies to the mailbox will be enforced.
If you’ve managed an Exchange on-premises installation, you might be familiar with another type of hold, the in-place hold. These holds are being deprecated and removed from Exchange Online, so the only hold that will be supported after the fall of 2018 will be the litigation hold, which was introduced with Exchange Server 2010.
Creating a Litigation Hold in Office 365 using PowerShell
To place an Exchange Online mailbox on litigation hold using PowerShell, open a session to Exchange Online and then issue the following command:
Set-Mailbox mailbox@yourtenant.com -LitigationHoldEnabled $true -LitigationHoldDuration 365
To set a litigation hold on all mailboxes in your Office 365 tenant, use the following command:
Get-Mailbox -ResultSize Unlimited -Filter {RecipientTypeDetails -eq "UserMailbox"} | Set-Mailbox -LitigationHoldEnabled $true -LitigationHoldDuration 365
Creating a Litigation Hold in Office 365 using the Web Interface
Alternatively, you can use the web interface, but it’s obviously going to take a lot more time to enable a litigation hold on multiple mailboxes than it takes to issue one Powershell command. But for one or two mailboxes, it is very simple:
1. Navigate to the Exchange Admin Center at https://outlook.office365.com/ecp. From the dashboard, select recipients and then double-click the mailbox you want to put on litigation hold. The following pop-up will appear:
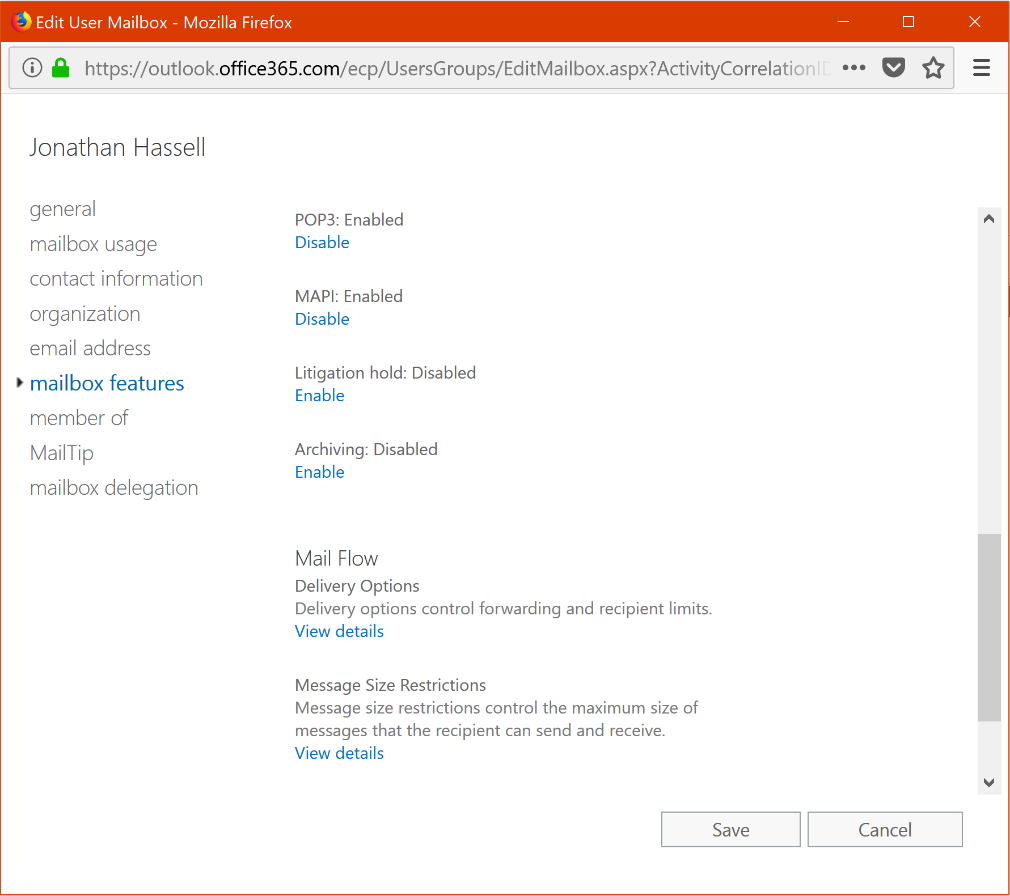
Figure 1. Putting a litigation hold on a mailbox
2. Click mailbox features on the left, and then scroll down to where it says “Litigation hold: Disabled.”
3. Click the Enable The following screen will appear:
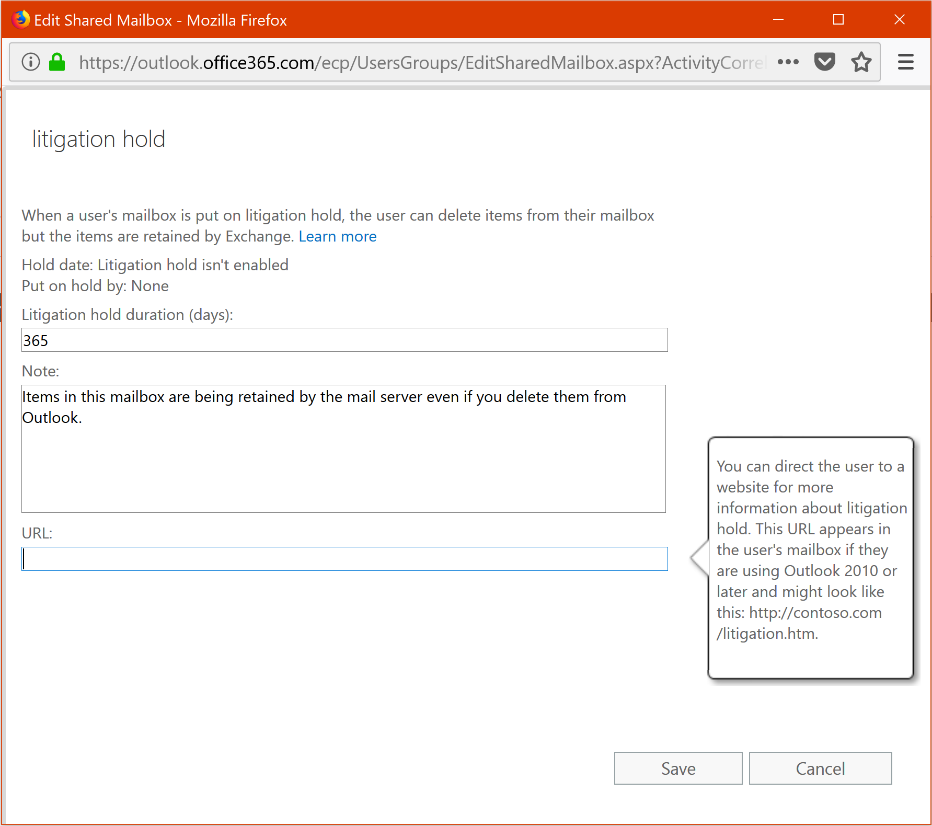
Figure 2. Enabling a litigation hold on a mailbox through the Exchange Admin Center
4. In the first field, enter the number of days the litigation hold is to remain effective. In the Note section, you can enter text that will be displayed to the end user in a small display ribbon in the Microsoft Outlook client — it’s a good way to explain to the user what’s happening and let them know that deleting an item does not actually remove it. You can also enter a URL to an intranet or internet site that describes the hold, the reason behind it, details about the legal case or whatever your communications team might want to say.
5. Click Save and then Save again, and the litigation hold will take effect.
To disable the hold, follow steps 1 and 2, but in step 3, instead of clicking Enable, click Disable. Then click Save.
Note: To be put on litigation hold, the mailbox must be assigned an Exchange Online Plan 2 license. If the license is different, you would have to assign it a separate Exchange Online Archiving license.
Office 365 eDiscovery
Sometimes, administrators will be asked to find all materials that deal with a certain keyword or keywords across the organization’s Exchange Online mailboxes, Office 365 groups, Microsoft Teams, SharePoint Online and OneDrive for Business sites, and Skype for Business conversations.
Creating an eDiscovery Case
Office 365 provides eDiscovery capabilities in the Office 365 Security and Compliance Center. To use these components, take the following steps:
1. In the Security and Compliance Center, from the left menu, choose Search & Investigation, and then choose eDiscovery in the sub-menu. You’ll be presented with the following screen:
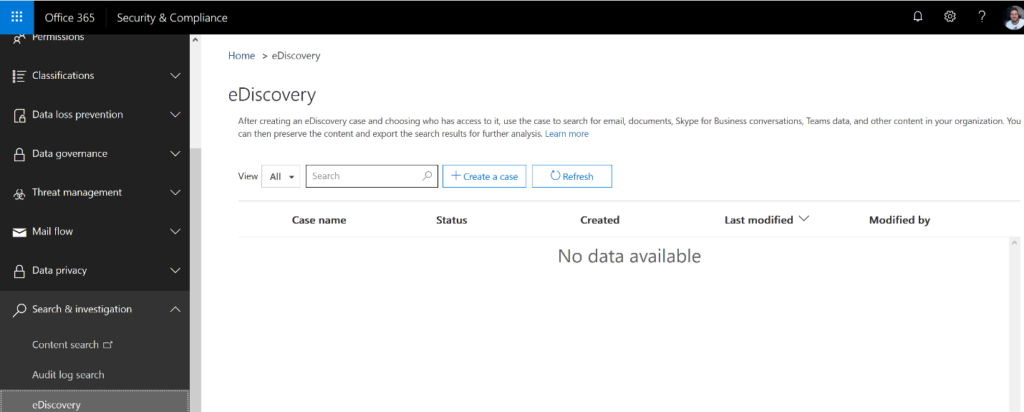
Figure 3. The eDiscovery portal in the Security & Compliance Center
2. Click + Create a case to create a new eDiscovery case. This is how you manage the holds, searches and exports for each term; you separate them into cases so that you can easily turn things on and off, close cases that are complete, and track what is happening with each search term. Give your case a friendly name and description, and then click Save.
3. Your case name will then appear in the list; click Open beside the case name to get started configuring discovery actions.
Configuring eDiscovery Actions
In the eDiscovery center, cases are split into three actions:
- Hold. To have a litigation hold automatically placed on all mailboxes, SharePoint sites and public folders with content that matches certain keywords and conditions, click Create query and follow the wizard; it is fairly self-explanatory. The key screen on the wizard is the one where you specify the query conditions. The figure below illustrates how to specify a keyword and a date filter to limit the scope of the search and resulting holds.
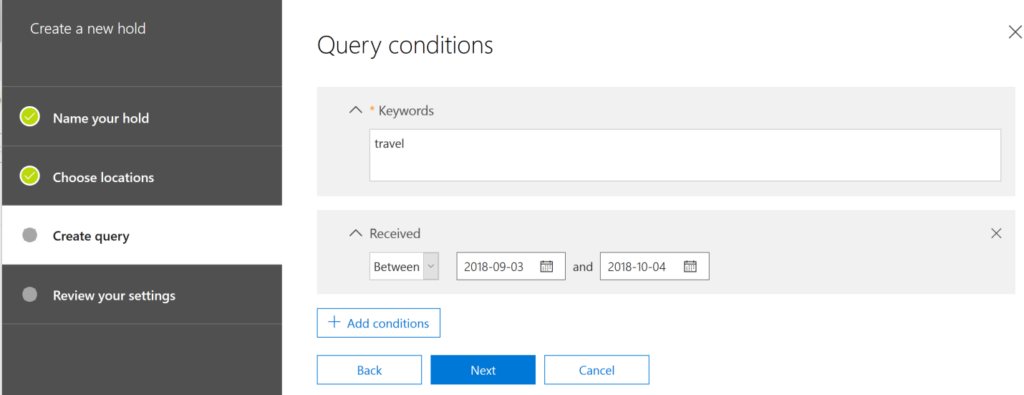
Figure 4. Specifying query conditions
- Search. With the eDiscovery search, you can save and run content searches for keywords and other content, and you can set the scope of the search to only held locations, all content locations or a custom configuration. Since you can save the search query, you can start one, step away and come back after it is complete. This is a good option for larger tenants.
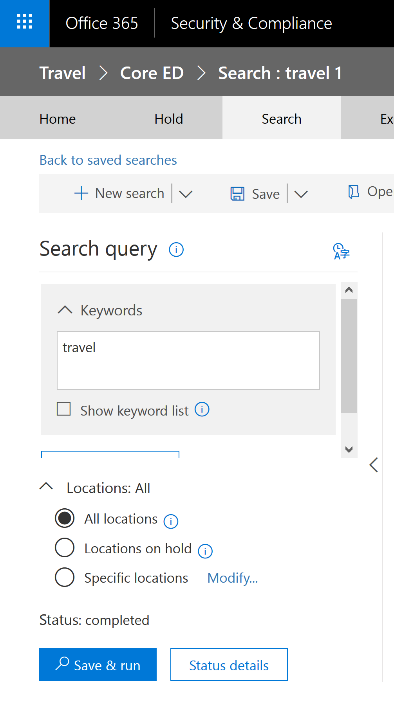
Figure 5. Searching
- Export. The export area allows you to export search results to a PST file, which you can then download and open on your own local computer or provide to counsel. You can choose to export to a single PST file or to one PST file per mailbox, and the output will be encrypted using a key that you choose. The wizard will walk you through the steps required to export data.
Note: If your organization is subscribed to an Office 365 E5 plan, you can execute a deep analysis of case data by using Office 365 Advanced eDiscovery.
Assigning eDiscovery Permissions
Being able to globally search on whatever keyword you specify across all of the mailboxes in your tenant is a sensitive privilege that requires discretion and respect. Therefore, you need to assign a designated eDiscovery manager who will have permissions to preview search results, export results and manage all aspects of the eDiscovery process. Choose this person wisely; they will have full access to every piece of data stored in your tenant, regardless of other permissions that are set.
To designate an eDiscovery manager, take the following steps:
1. In the administrator portal, go to Security & Compliance, and then click the only option in the left pane.
2. Scroll down to the eDiscovery Manager role and click the check box, and the pop-up window shown in Figure 10-6 will appear. Specify a user for the eDiscovery Manager role and a user for the eDiscovery Administrator role — the latter needs to have administrative privileges.
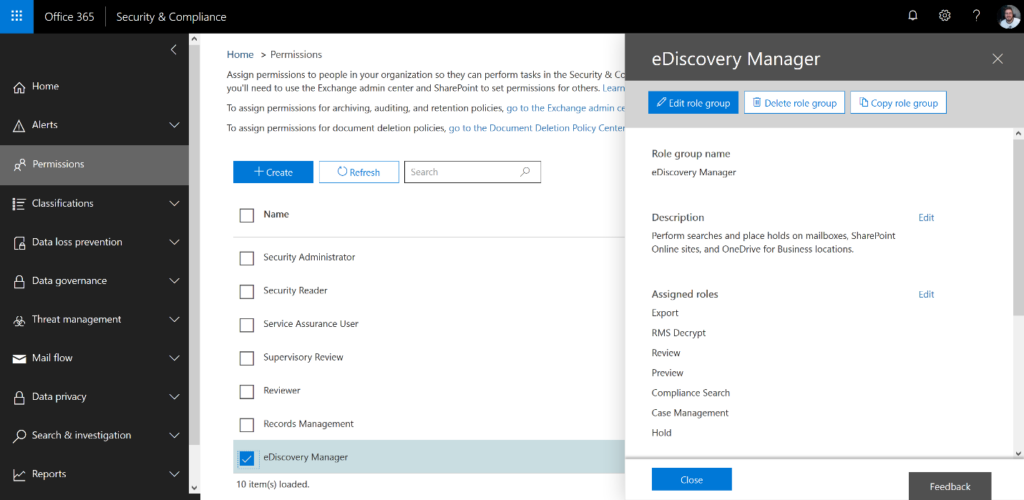
Figure 6. Designating an eDiscovery manager
What is the difference between Litigation Hold and In-Place Hold migration?
Follow
What is the difference between Litigation Hold and In-Place Hold migration?
Answer:
Litigation Hold migration involves putting a user's entire mailbox on hold for the purpose of retaining it for legal review.
In-Place Hold migration involves putting a subset of a user's entire mailbox on hold for the purpose of retaining only certain types of email.
The only difference between these two types of migration is a query. Litigation Hold can be enabled to hold all items that are deleted or modified. In-Place Hold is set up like Litigation Hold, but adds a filter query to only retain specific kinds of email.
Litigation Hold works like this:
In the normal deleted item workflow, a mailbox item is moved to the Deletions subfolder in the Recoverable Items folder when a user permanently deletes it, or deletes it from the Deleted Items folder. A deletion policy (which is a retention tag configured with a Delete retention action) also moves items to the Deletions subfolder when the retention period expires. When a user purges an item in the Recoverable Items folder, or when the deleted item retention period expires for an item, it is moved to the Purges subfolder in the Recoverable Items folder and marked for permanent deletion. It will be purged from Exchange the next time the mailbox is processed by the Managed Folder Assistant (MFA).
When a mailbox is placed on Litigation Hold, items in the Purges subfolder are preserved for the hold duration specified by the Litigation Hold. The hold duration is calculated from the original date an item was received or created, and defines how long items in the Purges subfolder are held. When the hold duration expires for an item in the Purges subfolder, the item is marked for permanent deletion and will be purged from Exchange the next time the mailbox is processed by the MFA. If an indefinite hold is placed on a mailbox, items will never be purged from the Purges subfolder.
No comments:
Post a Comment